15 Best Hikes in Zion National Park
Fifteen Zion hikes across the main canyon, east side, Kolob Canyons, and Kolob Terrace, with reviewed maps, elevation profiles, permit notes, and live alerts.
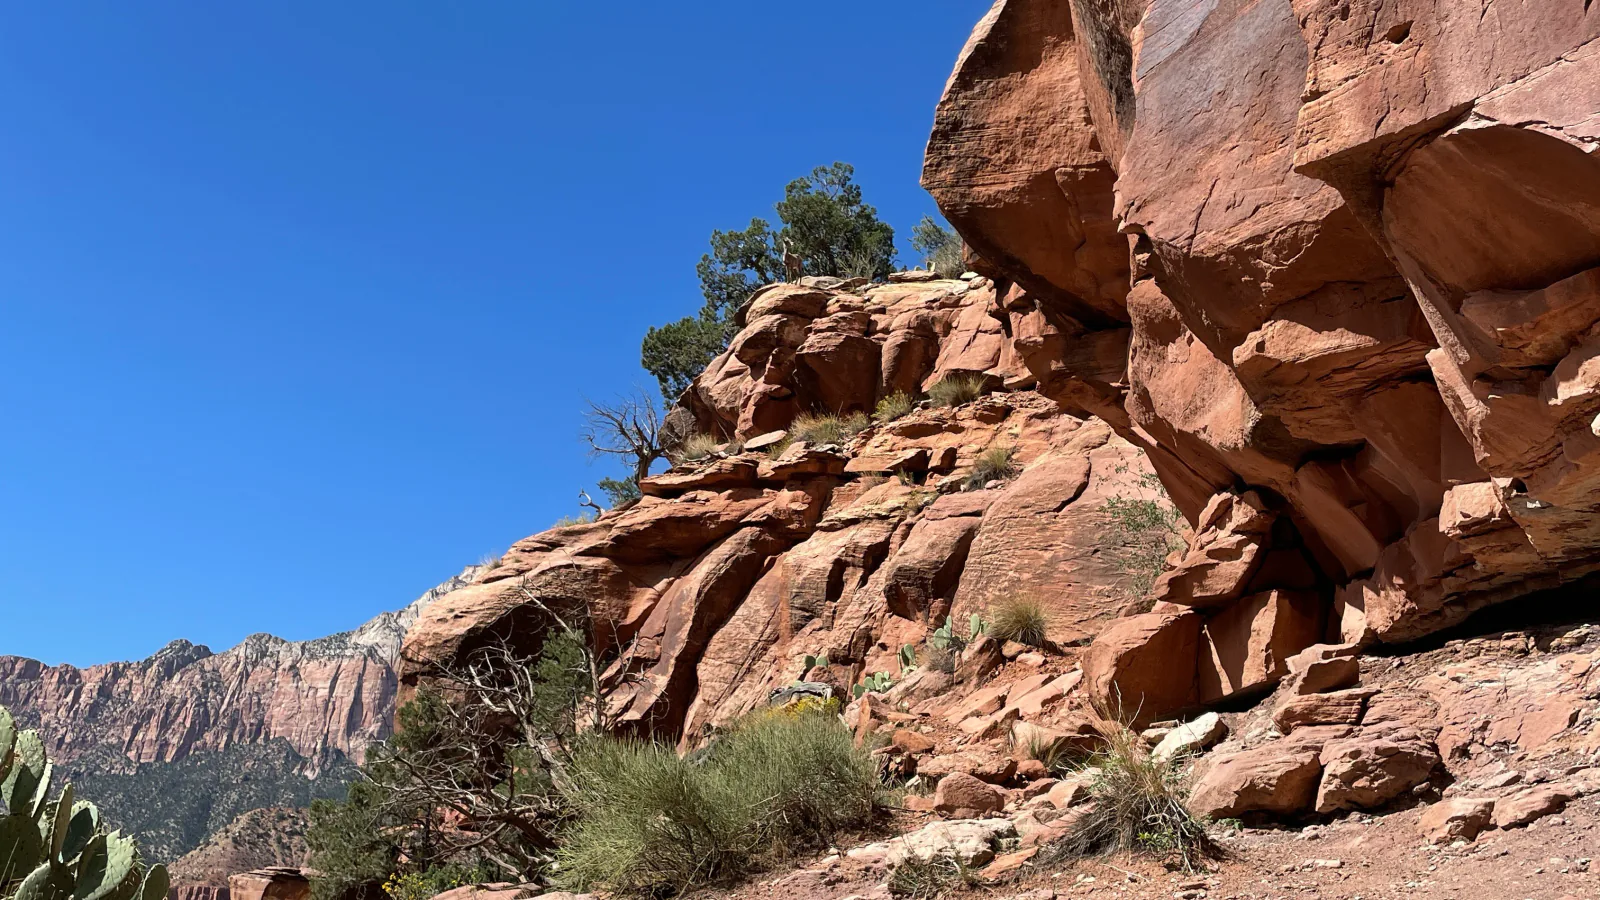
Zion does not have one kind of hiking day. A paved river path can start near the visitor center, a chain-assisted ridge may require a lottery permit, and a fourteen-mile canyon route begins forty miles away at Kolob Canyons. These 15 hikes are grouped by how a visitor actually reaches and uses them, not by an app's popularity score.
Two pairs are intentionally related. Riverside Walk is a dry, mostly paved outing; the Narrows continues into the Virgin River after that path ends. Scout Lookout is the permit-free West Rim climb; Angels Landing adds the exposed chain section beyond it. Keeping each option separate makes the turnaround decisions visible instead of hiding them inside one headline route.
Distances and elevation figures come from the reviewed route files shown on the page. The park's shuttle schedule, flash-flood forecast, river flow, heat, rockfall, mud, and permit rules can change the sensible choice on the day. Read the live NPS alerts before committing to any canyon or rim route.
What changes a hiking day here
The shuttle is part of the trail plan
For most of the year, private vehicles cannot use Zion Canyon Scenic Drive beyond Canyon Junction. Match the trail to its shuttle stop, allow roughly 45 minutes to reach the Temple of Sinawava, and note the last bus out before starting a late hike. Pa'rus and Watchman begin near the visitor center; east-side and Kolob routes require a separate drive.
Heat and exposure change the mileage
Summer canyon temperatures regularly exceed 100°F, while high rims can be windy or icy. Start open routes early, carry more water than the mileage suggests, and turn around before heat illness, thunder, or poor footing makes the decision for the group. There is little dependable drinking water away from developed stops.
One permit does not cover every route
A permit is required only for the chain section from Scout Lookout to Angels Landing, not for the hike to Scout Lookout itself. Top-down Narrows trips and overnight wilderness travel use separate permits. Shuttle access, park entry, and most ordinary day hikes do not require a trail reservation.
A dry sky is not a flood forecast
Rain far upstream can send water through a narrow canyon within minutes. Check the official flash-flood potential and current Virgin River flow before the Narrows or any wash. The Narrows closes above 150 CFS and during a Flash Flood Warning; toxic cyanobacteria also means no drinking river water or submerging your head.
| Trail | Distance | Time | Difficulty | Best for |
|---|---|---|---|---|
| Pa'rus Trail | 3.3 mi | 1 hr 5 min | Easy | A paved river walk, adaptive outing, bike ride, or leashed-dog hike |
| Watchman Trail | 3.3 mi | 1 hr 37 min | Moderate | A substantial canyon hike without boarding the shuttle |
| Canyon Overlook Trail | 1 mi | 30 min | Moderate | A short east-side hike with a large canyon view |
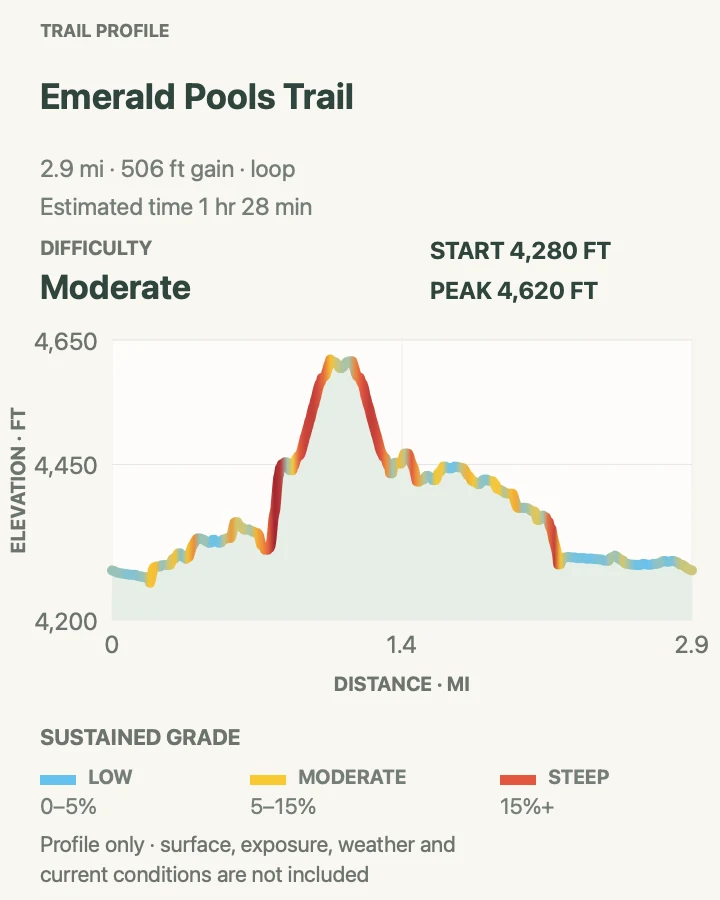
| Emerald Pools Loop | 3 mi | 1 hr 28 min | Moderate | Waterfalls, hanging gardens, and a flexible family route |
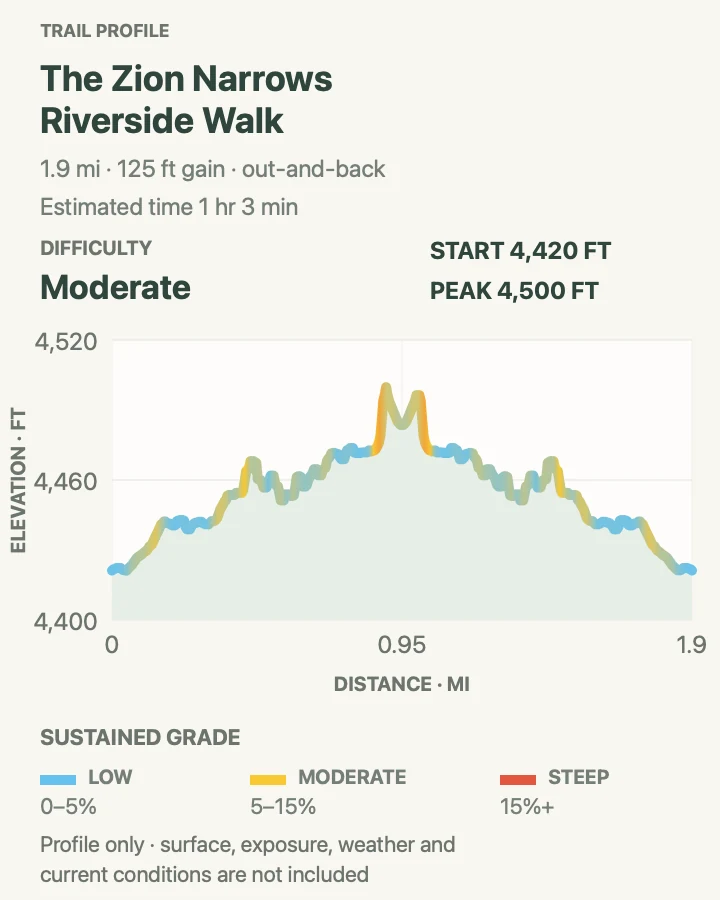
| Riverside Walk | 2.1 mi | 1 hr 3 min | Moderate | A deep-canyon walk without entering the river |
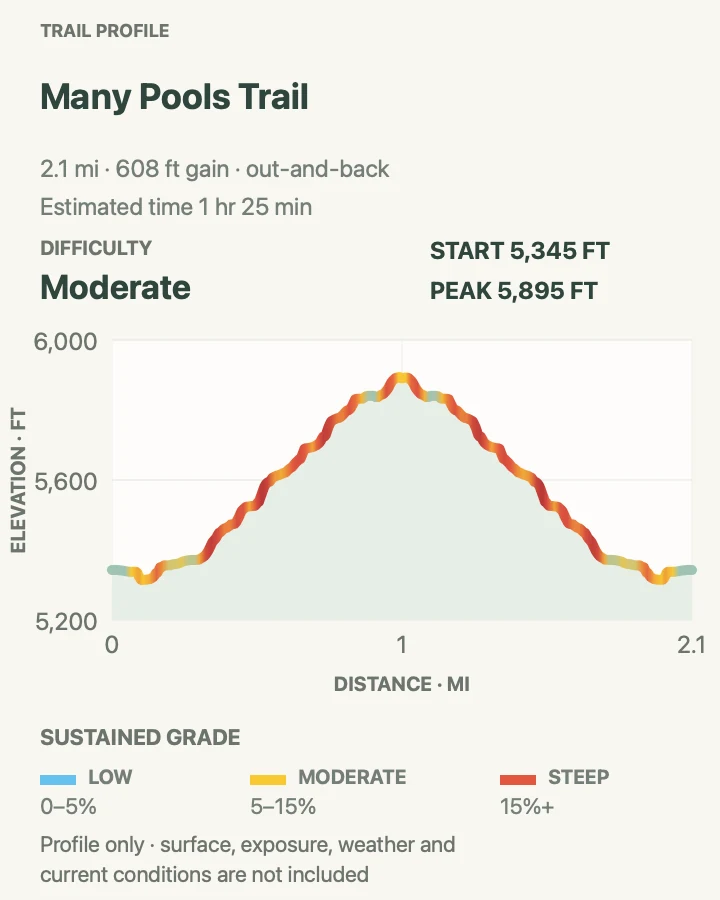
| Many Pools Route | 2.1 mi | 1 hr 25 min | Moderate | East-side slickrock, desert potholes, and light route-finding |
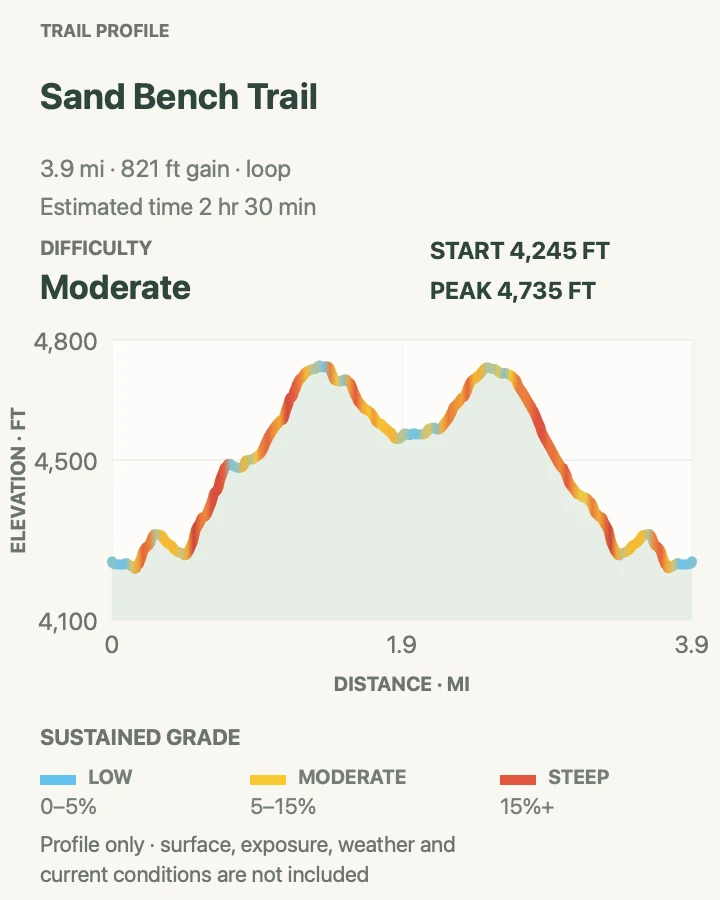
| Sand Bench Loop | 3.9 mi | 2 hr 30 min | Moderate | A quieter canyon-floor loop with broad views |
| Scout Lookout via West Rim Trail | 3.8 mi | 3 hr | Hard | The classic West Rim climb without an Angels Landing permit |
| Angels Landing | 4.8 mi | 3 hr 46 min | Hard | Experienced hikers comfortable with extreme exposure |
| The Narrows to Big Spring | 9.3 mi | 5 hr 51 min | Hard | A full-day river hike between towering canyon walls |
| Observation Point via East Mesa Trail | 7 mi | 3 hr | Moderate | A high view down Zion Canyon without climbing from the canyon floor |
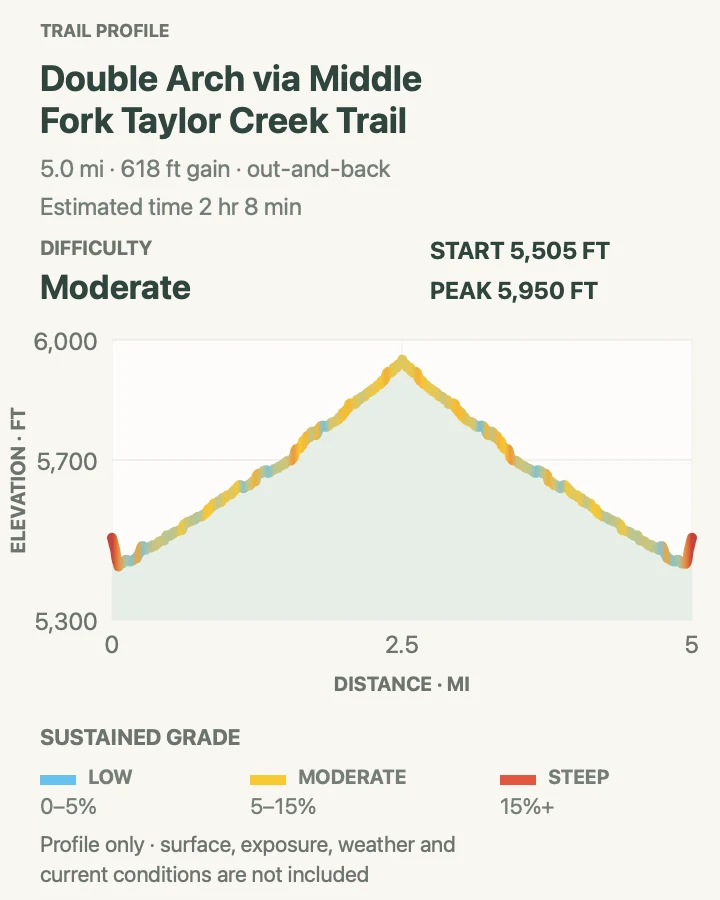
| Taylor Creek to Double Arch Alcove | 5.1 mi | 2 hr 8 min | Moderate | A shaded Kolob box canyon with history and repeated creek crossings |
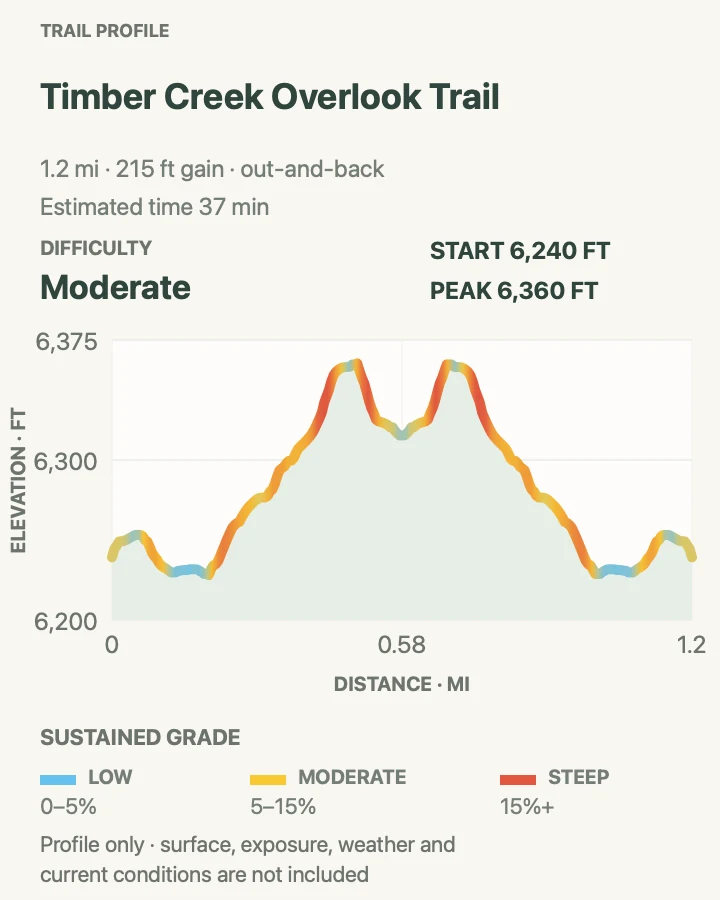
| Timber Creek Overlook Trail | 1.2 mi | 37 min | Moderate | A short ridge walk with broad Kolob views |
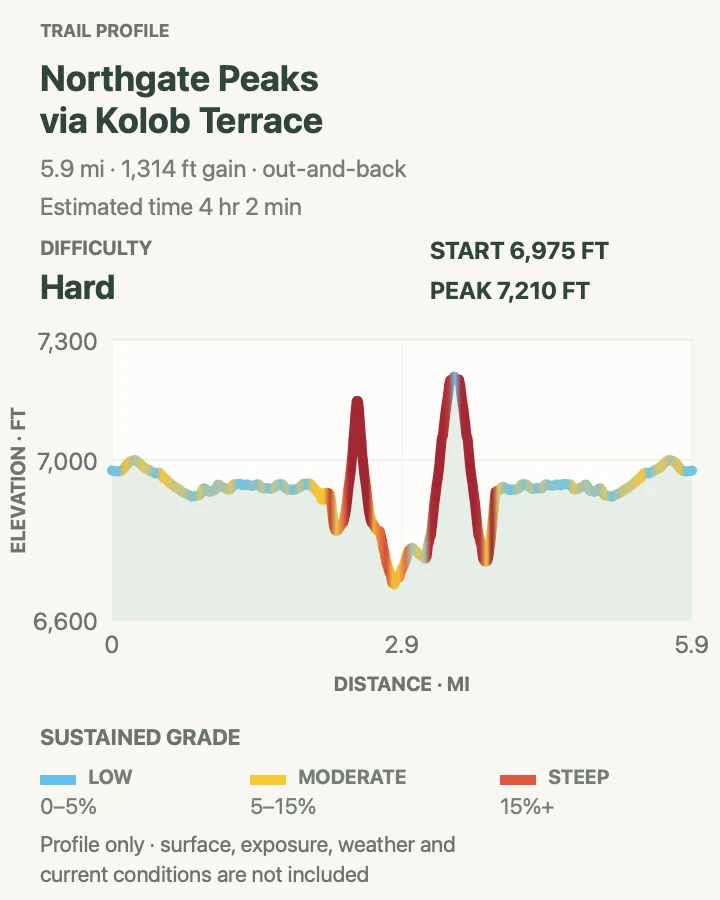
| Northgate Peaks via Kolob Terrace | 5.9 mi | 4 hr 2 min | Hard | Quiet high-country forest and a remote sandstone viewpoint |
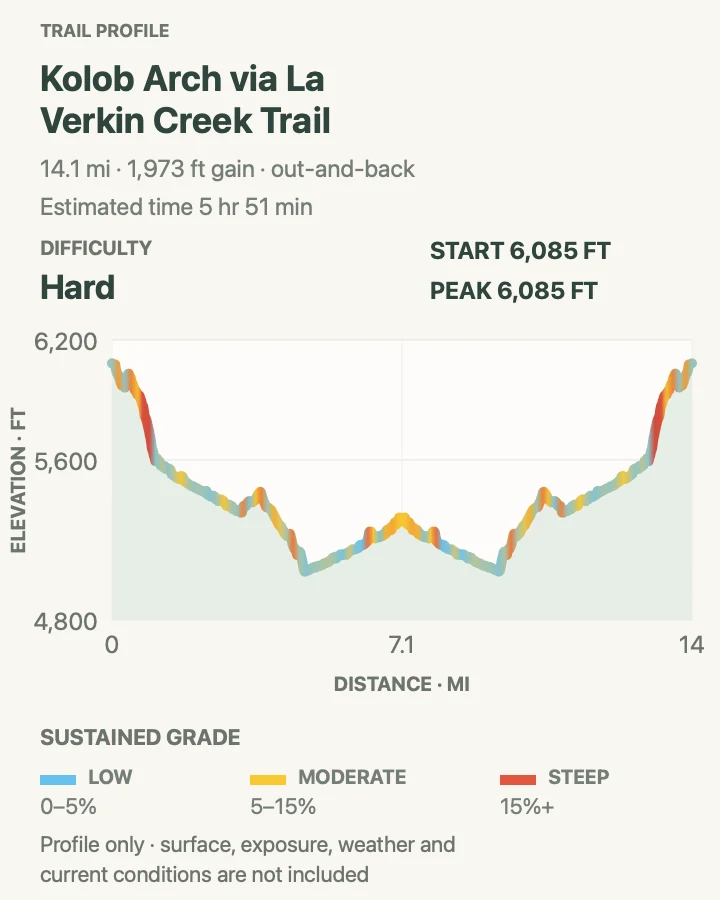
| Kolob Arch via La Verkin Creek Trail | 14.2 mi | 5 hr 51 min | Hard | A demanding wilderness day to one of the world's largest freestanding arches |
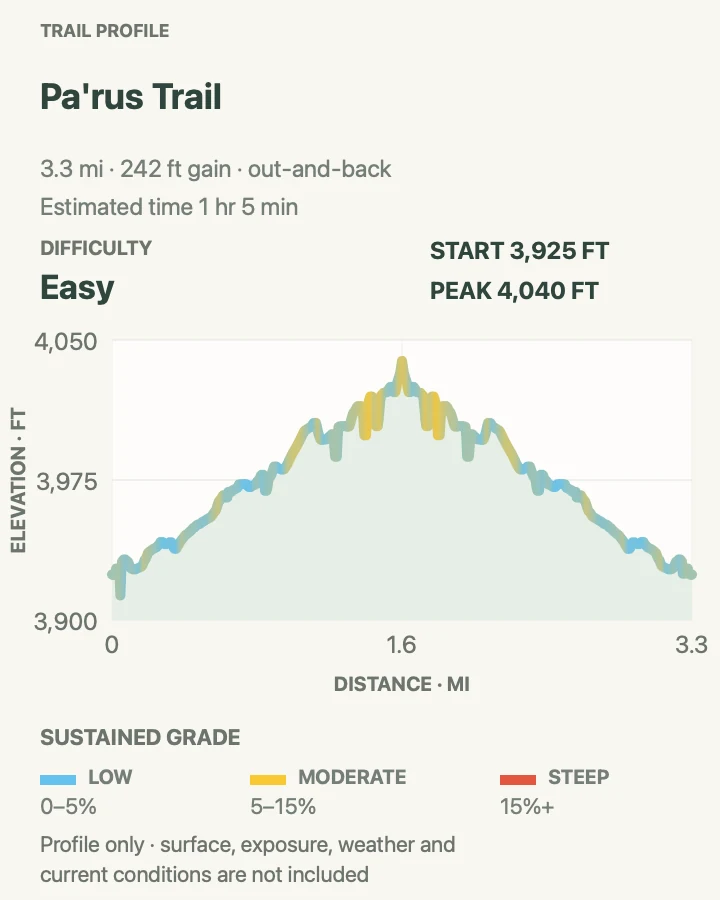
Pa'rus Trail
- Distance
- 3.3 mi
- Elevation gain
- 240 feet
- Time
- 1 hr 5 min
- Difficulty
- Easy
- Route type
- out-and-back
- Parking
- Begin at the Zion Canyon Visitor Center or use a signed South Campground connector; no canyon shuttle ride is required.
- Best time
- Sunrise, late afternoon, or any cool shoulder-season day.
- Pets
- Leashed pets are allowed on Pa'rus Trail. Trained service animals are allowed.
Pa'rus follows the Virgin River from the visitor-center area toward Canyon Junction. Bridges switch banks several times, and the open corridor frames the Watchman without committing hikers to a climb.
This is Zion's only trail open to pets and bicycles. It is paved and among the park's most accessible choices, though short slopes, heat, sand, and busy mixed use still matter. Cyclists should yield and slow well before blind bends or crowded bridge approaches.
What helps on this route
- Use the trail as a car-free sunset walk when the canyon shuttle queue is no longer appealing.
- Keep dogs leashed and off riverbanks; cyanobacteria guidance applies to pets too.
Terrain and access: Paved multi-use path, several bridges, gentle grades, exposed sun, and occasional sand or debris after storms.

Watchman Trail
- Distance
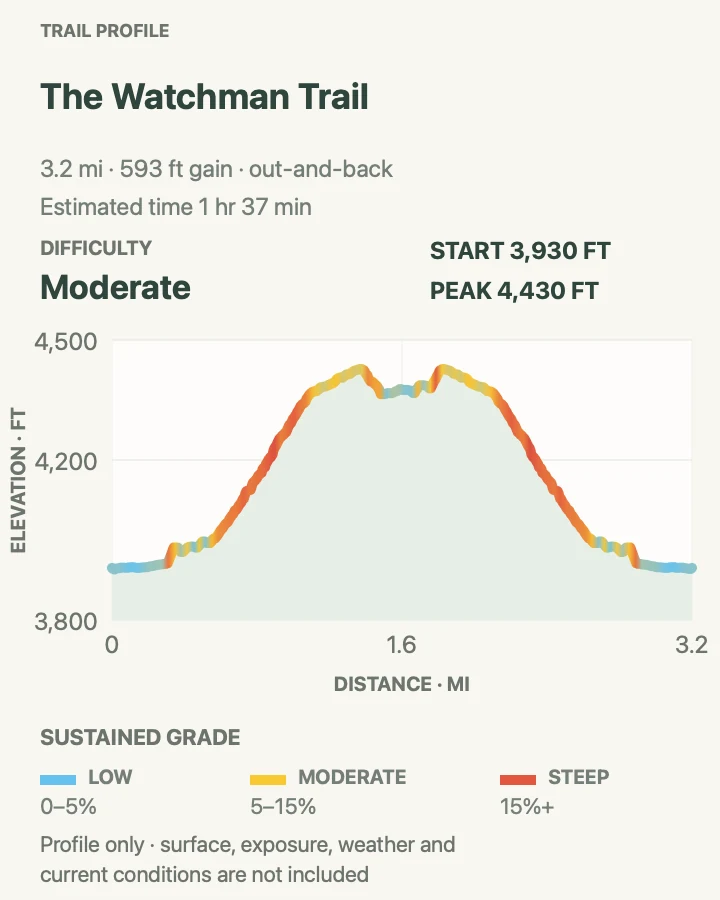
- 3.3 mi
- Elevation gain
- 590 feet
- Time
- 1 hr 37 min
- Difficulty
- Moderate
- Route type
- out-and-back
- Parking
- Walk from the visitor center; the trailhead lies near the Watchman Campground entrance.
- Best time
- Early morning in warm months or late afternoon when the switchbacks have shade.
- Pets
- Pets are not allowed on park trails. Trained service animals are allowed.
Watchman Trail climbs a bench above the visitor center to a loop with views over Springdale, lower Zion Canyon, and the Towers of the Virgin. The route does not summit the Watchman; its payoff is the open perch below it.
Most of the gain arrives on exposed switchbacks. The tread narrows around rock outcrops, and shade is sparse after morning. Because the start is easy to reach, this hike also works on arrival or departure day when a canyon itinerary would be too cumbersome.
What helps on this route
- Carry water from the visitor center; there is none on the overlook loop.
- Save energy for the sunny return rather than treating the upper loop as the finish.
Terrain and access: Firm dirt and rock, steady switchbacks, short narrow sections, open desert slope, and a rolling viewpoint loop.

Canyon Overlook Trail
- Distance
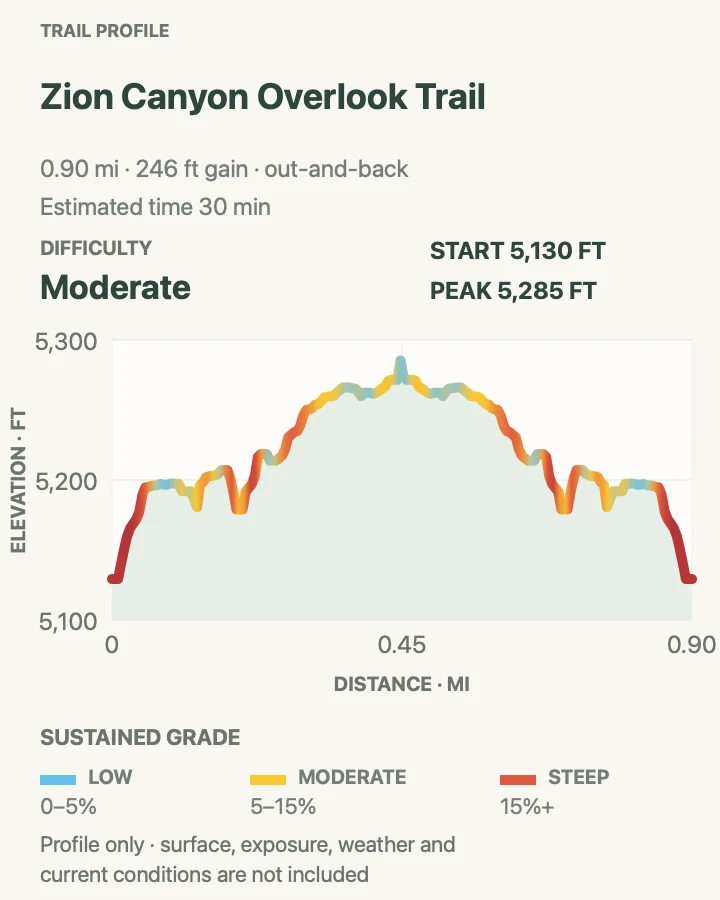
- 1 mi
- Elevation gain
- 250 feet
- Time
- 30 min
- Difficulty
- Moderate
- Route type
- out-and-back
- Parking
- Use only legal spaces near the east portal of the Zion–Mount Carmel Tunnel; parking is extremely limited and turning around may be necessary.
- Best time
- Morning before tunnel traffic and heat build, or a clear winter day without ice.
- Pets
- Pets are not allowed on park trails. Trained service animals are allowed.
Built by Civilian Conservation Corps crews, Canyon Overlook crosses ledges and a sheltered alcove to a viewpoint above Pine Creek Canyon. Railings protect many of the sharpest edges, but they do not remove every drop-off.
The one-mile round trip is easier than the parking problem. Never stop in the tunnel or occupy an unsigned shoulder. If no space is available, continue east and return later rather than adding a dangerous roadside walk.
What helps on this route
- Keep children beside an adult on ledges and at the final viewpoint.
- Microspikes may help in winter, but turn around if ice covers exposed steps.
Terrain and access: Rock steps, sandy ledges, a short bridge, fenced and unfenced drop-offs, shade in the alcove, and an exposed overlook.

Emerald Pools Loop
- Distance
- 3 mi
- Elevation gain
- 510 feet
- Time
- 1 hr 28 min
- Difficulty
- Moderate
- Route type
- loop
- Parking
- Ride the canyon shuttle to Zion Lodge, stop 5; the rebuilt bridge gives direct access from the lodge lawn.
- Best time
- Morning before the pool system becomes busy, or after rain once rockfall and flood hazards have cleared.
- Pets
- Pets are not allowed on park trails. Trained service animals are allowed.
The Emerald Pools system links lower, middle, and upper basins beneath streaked sandstone walls. The lower path passes behind seasonal water; higher connectors trade pavement for sand, stone, and a steeper final approach.
The Zion Lodge bridge reopened in 2025, restoring the direct start. Water volume varies dramatically, and the pools are never swimming holes. Wet ledges become slick, ice forms in winter, and rockfall can close individual connectors even when the rest of the system stays open.
What helps on this route
- Choose the lower pool alone when time, heat, or footing argues against the upper climb.
- Do not linger directly beneath falling ice or recent rockfall scars.
Terrain and access: Paved lower approach, wet alcove, sandy ledges, stone steps, moderate drop-offs, and a steeper rocky finish to the upper pool.

Riverside Walk
- Distance
- 2.1 mi
- Elevation gain
- 130 feet
- Time
- 1 hr 3 min
- Difficulty
- Moderate
- Route type
- out-and-back
- Parking
- Ride the Zion Canyon shuttle to Temple of Sinawava, stop 9, and note the final return departure.
- Best time
- A cool morning or shoulder-season afternoon when the paved path is not icy.
- Pets
- Pets are not allowed on park trails. Trained service animals are allowed.
Riverside Walk follows the Virgin River beneath narrowing walls to the point where ordinary trail ends and Narrows travel begins. The first 0.4 mile is accessible with assistance, though sand, grades, and crowding can affect passage.
This outing stays on dry land. Water conditions still matter because flood warnings can affect the corridor, and cyanobacteria guidance applies along the river. Rock squirrels approach people here; feeding them harms wildlife and can lead to bites.
What helps on this route
- Turn around at the river entry if the group lacks proper footwear, layers, or a safe flood forecast.
- Leave enough time for the shuttle ride out of the canyon.
Terrain and access: Mostly paved riverside path, intermittent sand, short grades, overhanging walls, and a narrow canyon terminus.

Many Pools Route
- Distance
- 2.1 mi
- Elevation gain
- 610 feet
- Time
- 1 hr 25 min
- Difficulty
- Moderate
- Route type
- out-and-back
- Parking
- Use a legal pullout east of the Zion–Mount Carmel Tunnel; do not block the highway or walk through the tunnel.
- Best time
- A dry spring morning when potholes hold water but no storm is in the drainage.
- Pets
- Pets are not allowed on park trails. Trained service animals are allowed.
Many Pools climbs a sandstone drainage past water-filled potholes and cross-bedded rock. There is no formal signed trail in the canyon-guide sense; hikers follow the wash and choose sensible slickrock lines.
That informality is the point and the risk. Avoid cryptobiotic soil, never enter when flash flooding is possible, and turn around before scrambling becomes uncomfortable. Pools can be empty in dry periods, while wet sandstone becomes unexpectedly slick.
What helps on this route
- Download the route before losing service, but let terrain and park closures overrule the line.
- Step on durable rock rather than cutting across living soil crust.
Terrain and access: Unmarked slickrock drainage, potholes, short scrambles, little shade, and route-finding on durable surfaces.

Sand Bench Loop
- Distance
- 3.9 mi
- Elevation gain
- 820 feet
- Time
- 2 hr 30 min
- Difficulty
- Moderate
- Route type
- loop
- Parking
- Use Court of the Patriarchs or the Zion Lodge connection according to current shuttle access and trail signs.
- Best time
- Cool weather from late fall through spring; avoid the exposed bench in summer heat.
- Pets
- Pets are not allowed on park trails. Trained service animals are allowed.
Sand Bench climbs onto the remains of an ancient landslide beneath the Sentinel. Its open position creates a different view of Zion Canyon than the shaded river paths, with the Patriarchs and canyon walls visible across much of the loop.
The name is literal: very soft sand covers long sections and makes the elevation feel harder. Commercial horse groups use the trail from March through October. Step aside early, follow wrangler instructions, and expect manure, dust, and almost no shade.
What helps on this route
- Carry extra water and treat the sandy climb as harder than a firm four-mile path.
- Move to the downhill side when horses approach unless the wrangler directs otherwise.
Terrain and access: Deep sand, firm dirt, horse traffic, an occasional shallow creek crossing, open sun, and roughly a thousand feet of cumulative gain.

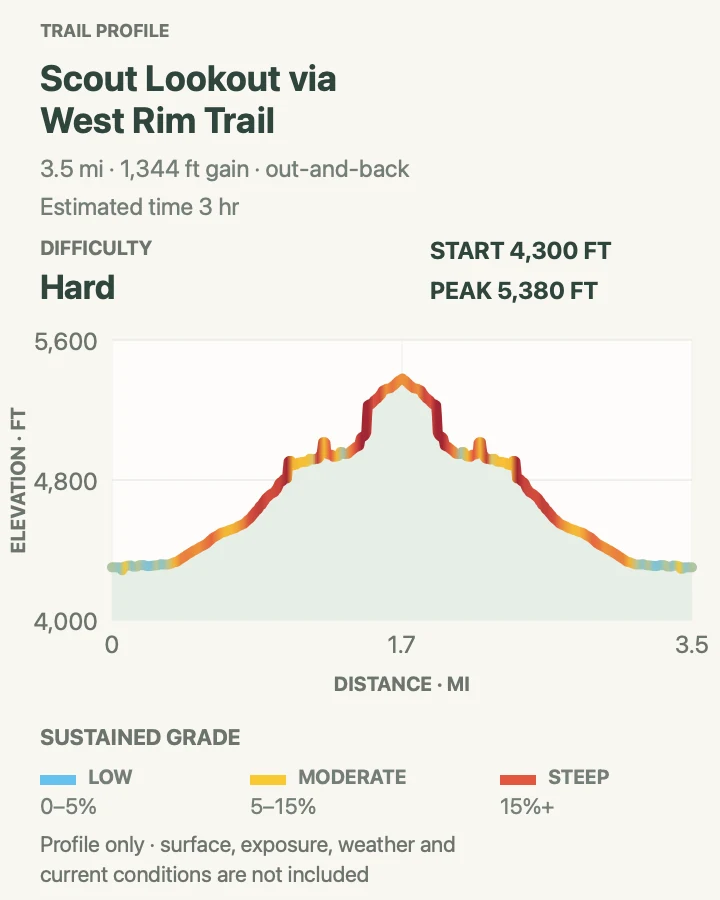
Scout Lookout via West Rim Trail
- Distance
- 3.8 mi
- Elevation gain
- 1,340 feet
- Time
- 3 hr
- Difficulty
- Hard
- Route type
- out-and-back
- Parking
- Take the canyon shuttle to the Grotto, stop 6, cross the footbridge, and follow West Rim Trail signs.
- Best time
- A cool morning before Refrigerator Canyon and Walter's Wiggles become crowded.
- Pets
- Pets are not allowed on park trails. Trained service animals are allowed.
West Rim Trail rises from the Virgin River through open switchbacks, cool Refrigerator Canyon, and Walter's Wiggles to Scout Lookout. The turnaround gives a serious canyon view without entering the Angels Landing chain section.
No Angels Landing permit is needed to stop here. The path is still steep, exposed to heat on its lower switchbacks, and busy where permitted hikers sort themselves at the junction. Keep the chain-route entrance clear and descend with control.
What helps on this route
- Choose Scout Lookout deliberately if heights, wind, ice, or permit availability make Angels Landing a poor fit.
- Carry water from the Grotto; none is available on the climb.
Terrain and access: Paved and stone switchbacks, a shaded canyon, Walter's Wiggles, long drop-offs near the rim, and about one thousand feet of gain.

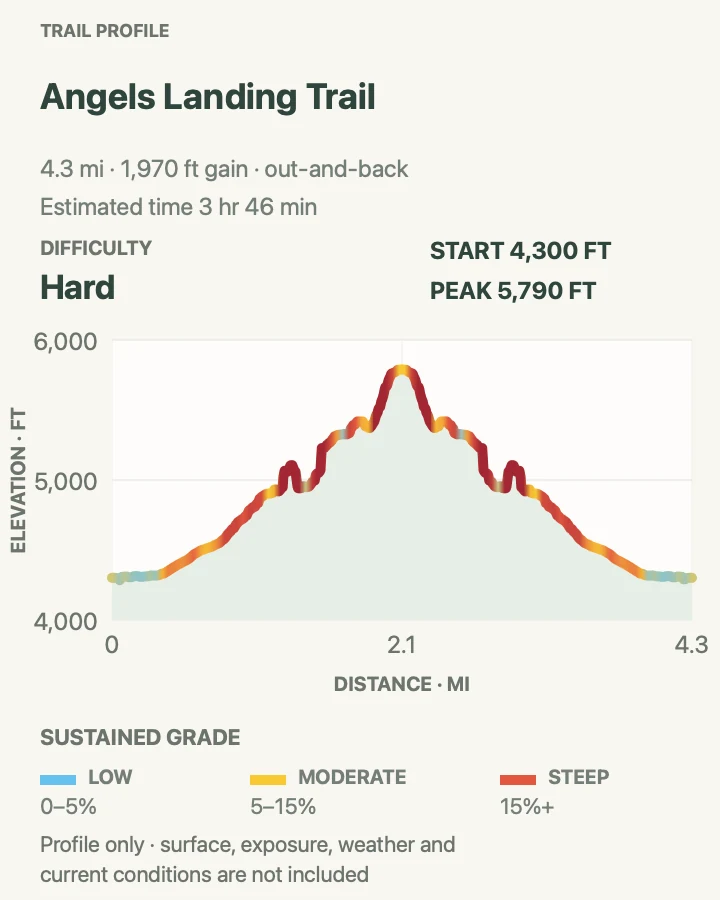
Angels Landing
- Distance
- 4.8 mi
- Elevation gain
- 1,970 feet
- Time
- 3 hr 46 min
- Difficulty
- Hard
- Route type
- out-and-back
- Parking
- Ride the shuttle to the Grotto, stop 6, and carry the permit associated with the named permit holder.
- Best time
- The permitted time window on a dry, calm day without ice or thunderstorms.
- Pets
- Pets are not allowed on park trails. Trained service animals are allowed.
Angels Landing shares the West Rim approach to Scout Lookout, then follows a narrow fin using chains and carved steps. A permit is required for everyone entering that final section; seasonal and day-before lotteries operate through Recreation.gov.
The chains do not make the ridge safe for every person or every day. Two-way traffic, polished rock, high wind, ice, and a severe fear of heights are valid reasons to stop at Scout Lookout. A permit grants access, not a promise that conditions are suitable.
What helps on this route
- Keep both hands free and stow phones before entering chain sections.
- Let faster or opposing hikers pass only at a stable, wider point.
Terrain and access: Sustained paved climb, tight switchbacks, narrow sandstone fin, chains, carved steps, and unprotected thousand-foot exposure.

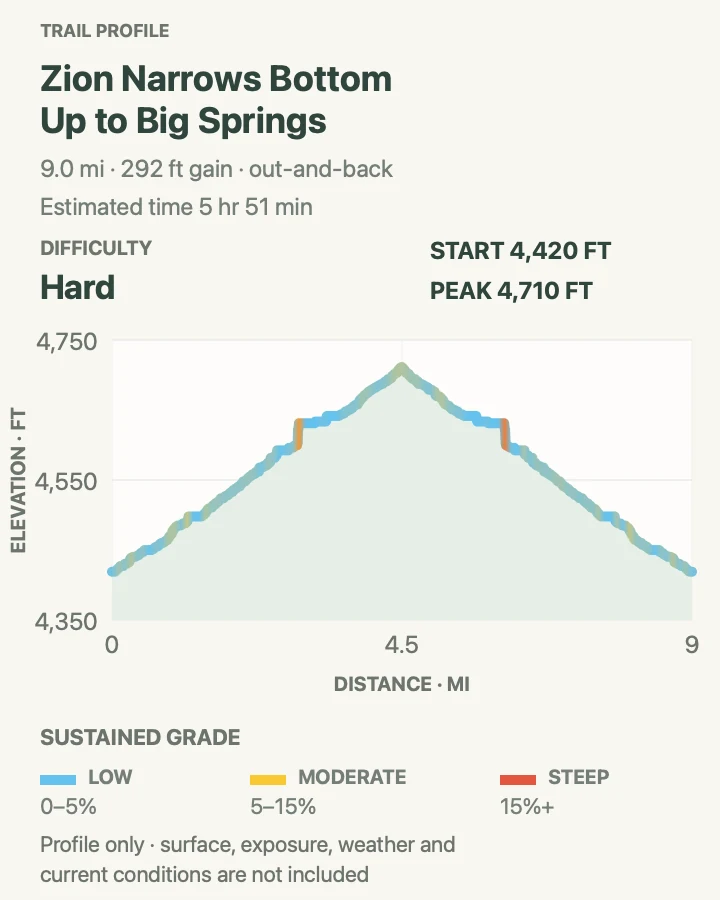
The Narrows to Big Spring
- Distance
- 9.3 mi
- Elevation gain
- 290 feet
- Time
- 5 hr 51 min
- Difficulty
- Hard
- Route type
- out-and-back
- Parking
- Take the shuttle to Temple of Sinawava, stop 9; Riverside Walk adds about two dry miles to the river portion.
- Best time
- Stable summer or early-fall weather with low flow, warm enough water, and no flash-flood concern.
- Pets
- Pets are not allowed on park trails. Trained service animals are allowed.
Bottom-up Narrows travel begins where Riverside Walk ends and continues in the Virgin River. Big Spring is the farthest legal turnaround for this permit-free day hike; upstream travel beyond it and entry into Orderville Canyon are prohibited.
At least sixty percent of the outing can involve wading, walking, or swimming. Closed-toe footwear, a sturdy stick, quick-drying layers, protected electronics, and honest current assessment matter more than pace. The route closes above 150 CFS and during a Flash Flood Warning.
What helps on this route
- Treat Big Spring as a maximum, not a required destination; turn around while the return still looks manageable.
- Never drink river water or submerge your head because toxic cyanobacteria may be present.
Terrain and access: Paved approach followed by cold moving water, submerged uneven boulders, deep pools, narrow canyon walls, and no conventional tread.

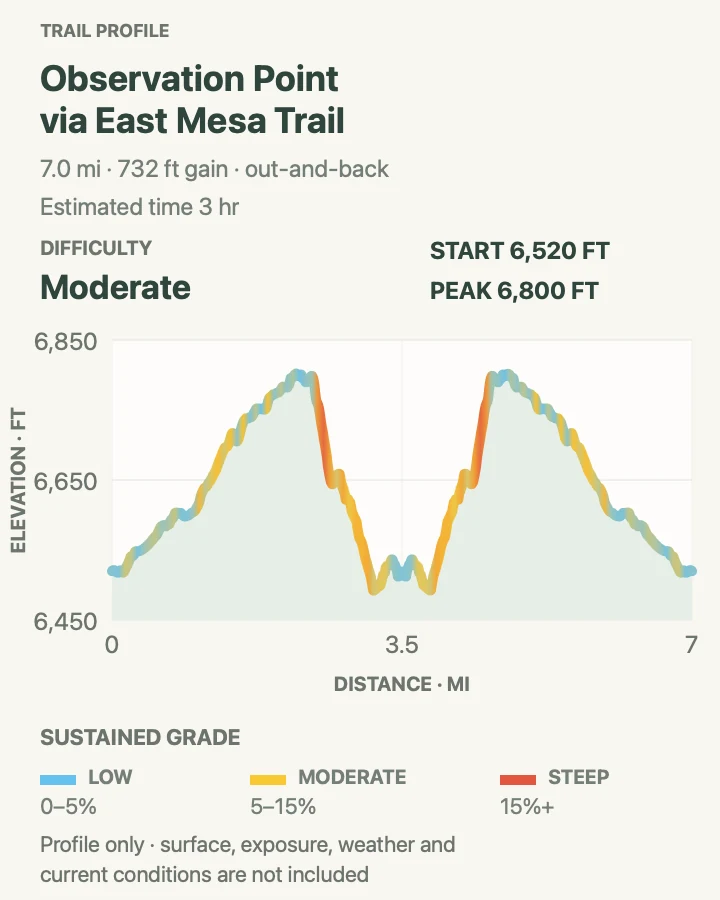
Observation Point via East Mesa Trail
- Distance
- 7 mi
- Elevation gain
- 730 feet
- Time
- 3 hr
- Difficulty
- Moderate
- Route type
- out-and-back
- Parking
- Reach East Mesa Trailhead from North Fork Road; NPS advises high-clearance four-wheel drive, and parking is allowed only in designated spaces.
- Best time
- A dry spring or fall day when the access road is firm and the rim is free of ice.
- Pets
- Pets are not allowed on park trails. Trained service animals are allowed.
East Mesa crosses ponderosa forest and open rim country to Observation Point above Zion Canyon. The walking is gentler than the old canyon-floor approach, but reaching the trailhead can be the day's hardest logistics.
The former route from Weeping Rock remains closed long term after a major rockfall and does not connect to this approach. North Fork roads become muddy and impassable after rain or snow. Use designated parking, respect private property, and arrange a local shuttle when vehicle clearance is doubtful.
What helps on this route
- Check road conditions before leaving pavement; do not assume four-wheel drive can repair a wet road decision.
- Carry a downloaded map because junctions on the mesa are quieter than Zion Canyon.
Terrain and access: Rolling forest road and trail, sand, mud after storms, minor rim grades, exposed final viewpoint, and remote trailhead access.

Taylor Creek to Double Arch Alcove
- Distance
- 5.1 mi
- Elevation gain
- 620 feet
- Time
- 2 hr 8 min
- Difficulty
- Moderate
- Route type
- out-and-back
- Parking
- Use the signed Taylor Creek Trailhead on Kolob Canyons Road; confirm the road is open before driving up.
- Best time
- Spring or fall, after ice has melted and before afternoon storms raise the creek.
- Pets
- Pets are not allowed on park trails. Trained service animals are allowed.
Taylor Creek enters a red-walled box canyon, passing the Larson and Fife homestead cabins before ending at Double Arch Alcove. Frequent creek crossings make the route feel exploratory without requiring technical scrambling.
Water depth changes with snowmelt and storms, while shaded rock can hold ice in winter. Wilderness group size is limited to twelve. The alcove is fragile; enjoy the scale from durable ground rather than climbing the walls or carving the sandstone.
What helps on this route
- Wear footwear that can handle repeated wet crossings instead of trying to balance on every stone.
- Keep the historic cabins intact and leave artifacts where they are found.
Terrain and access: Firm trail, many shallow creek crossings, sand, winter ice, historic cabin sites, and a narrowing sandstone canyon.

Timber Creek Overlook Trail
- Distance
- 1.2 mi
- Elevation gain
- 220 feet
- Time
- 37 min
- Difficulty
- Moderate
- Route type
- out-and-back
- Parking
- Drive Kolob Canyons Road to the signed overlook lot, subject to seasonal road closures.
- Best time
- Late afternoon in spring or fall, or a clear winter day when the road is open and tread is not icy.
- Pets
- Pets are not allowed on park trails. Trained service animals are allowed.
From the end of Kolob Canyons Road, this trail follows a ridge to views over Timber Creek, Kolob Terrace, and the Pine Valley Mountains. It delivers the district's scale in about a mile without the commitment of Taylor or La Verkin Creek.
The ridge is exposed to wind, sun, and winter ice, with limited shade. The small elevation change can still feel rough because of stones and uneven bedrock. Road status matters as much as trail status in cold weather.
What helps on this route
- Check Kolob Canyons Road before leaving Interstate 15.
- Stay on the ridge tread to protect thin desert soils and vegetation.
Terrain and access: Rocky ridge path, minor ledges, open sun and wind, gentle rolling grades, and an exposed final viewpoint.

Northgate Peaks via Kolob Terrace
- Distance
- 5.9 mi
- Elevation gain
- 1,310 feet
- Time
- 4 hr 2 min
- Difficulty
- Hard
- Route type
- out-and-back
- Parking
- Use Wildcat Canyon Trailhead on Kolob Terrace Road; the road and trailhead are seasonal and can remain muddy after snowmelt.
- Best time
- Late spring through fall after the terrace road opens and the plateau dries.
- Pets
- Pets are not allowed on park trails. Trained service animals are allowed.
The route leaves Wildcat Trailhead through ponderosa and meadow before turning toward Northgate Peaks. Its viewpoint looks across the Guardian Angels and a less-visited section of Zion Wilderness.
Snowmelt can keep the plateau muddy into summer, and seasonal springs should not be treated as reliable drinking water. The final approach is not a license to scramble onto either peak; stop at the established viewpoint unless the group is equipped for a separate technical objective.
What helps on this route
- Carry all water and a downloaded route from the trailhead.
- Turn around if mud would force travel off the established tread.
Terrain and access: Ponderosa forest, meadow, seasonal mud, rolling plateau trail, sandy viewpoint approach, and remote road access.

Kolob Arch via La Verkin Creek Trail
- Distance
- 14.2 mi
- Elevation gain
- 1,970 feet
- Time
- 5 hr 51 min
- Difficulty
- Hard
- Route type
- out-and-back
- Parking
- Start at Lee Pass Trailhead on Kolob Canyons Road; confirm road access and begin early enough for a fourteen-mile day.
- Best time
- A long spring or fall day with moderate temperatures and stable creek crossings.
- Pets
- Pets are not allowed on park trails. Trained service animals are allowed.
La Verkin Creek Trail drops from Lee Pass past open Kolob Canyons, follows Timber and La Verkin creeks, then uses a side trail to the Kolob Arch viewpoint. The arch sits high on the wall rather than over the trail, so binoculars improve the final view.
Fourteen miles, sand, creek crossings, and the return climb make this a full-day hike. Wilderness groups are limited to twelve. Treat every natural water source, carry a light for delays, and remember that overnight camping requires a designated-site permit even though a day hike does not.
What helps on this route
- Set a firm turnaround time before the arch spur, not after fatigue begins.
- Carry a filter or purifier plus enough reserve for a dry or contaminated creek.
Terrain and access: Long canyon descent, sand, hard-packed trail, creek crossings, cottonwood shade, remote arch spur, and more than one thousand feet of return climbing.

Official planning sources
Trail access and safety details were checked against these National Park Service pages. The maps and profiles use the reviewed route geometry stored with this guide.
Map data © OpenStreetMap contributors. Trail geometry and planning details include National Park Service public information.